Restoring a 1973 BMW R75/5 Motorcycle

January 1, 2007

It’s a gas

Filed under: 1973, airhead, BMW, motorcycle, R75/5, restore — Penforhire @ 4:04 pm

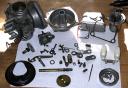
Cleaning all the little carburetor bits is a fairly dull task. No pictures to share I’m afraid and I’m nowhere near done. But I can tell you that steel wool is my friend.

Today I also took apart some of the remaining gas tank components and they are worthy of a few pics.

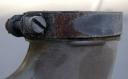
The gas cap is held onto the tank with a press-fit pin very similar to the carb’s float levels. This is the underside of my cap and it looks like the sealing surface could use replacement.

1697-gas-cap-underside.jpg

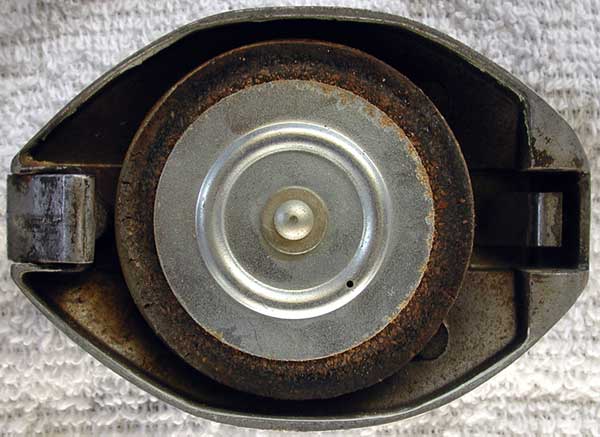
The hang-up is the center piece holding the sealing disk (seems like a stacked pair of rubber disks) in place is like a rivet. I can’t tell exactly how to remove it. Clymer and Haynes have nothing to say on the subject or I missed it. I do recall Joe holding up a brand new rivet in a plastic baggie and saying something about having to drill out the old one. I’m waiting for a call back from him to confirm the technique before doing something that irreversible. Some light prying confirms it is not about to just pop off.

Here are the emblems and their gaskets from the sides of the tank.

1698-tank-emblems.jpg

They are expensive-looking hefty ceramic-and-metal pieces. I recall dire warnings about making sure the tank curvature is correct and using the gaskets, otherwise cracking and crying will ensue. I’m not sure what the best way to polish up the emblems is yet. They have a slight yellow tinge.

Here are the rubber side panels, with one flipped over to show the waffle-pattern on the backside.

dscn-tank-panels.jpg

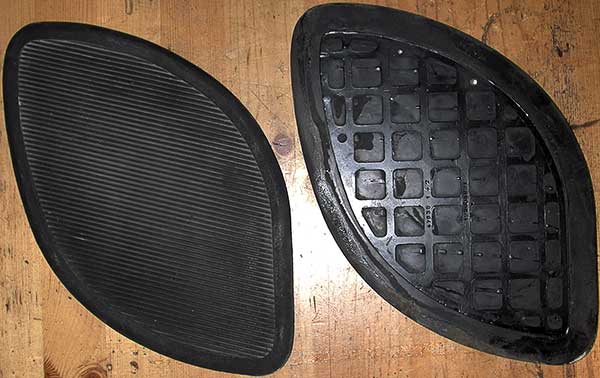
These are just mounted with glue so I heated the tank up in the sun and gently (well, gently for me) peeled them off. They are still flexible and might be renewable if I can get some plasticizer into the outer surfaces. Otherwise, IIRC, replacements cost $20-something each and I’m trying to avoid any expense that is not a cosmetic necessity. I’m staring at enough expenses as it is.

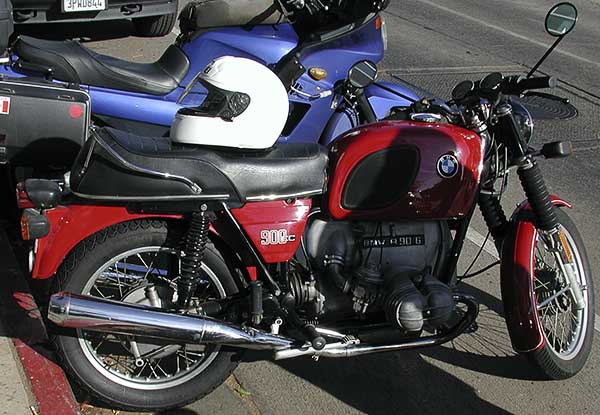
Here is the naked tank. Note this is not the “toaster” tank (metal side-panels) that seems to be more collectible now. What I read is the toaster was not so popular at the time because it is a smaller tank, 4+ gallons instead of 6+ gallons. Note my precision. What am I, Wikipedia?

1700-naked-tank.jpg

I didn’t mention it before but, after pulling off the fuel hoses all you have to do to remove the tank is unscrew two wing-nuts at the rear (under the seat) and pull the tank back and up, off a rubber bumper-thingie in front. I haven’t decided if I need to replace that rubber mount or the rubber under the wing-nuts. Their condition is okay now but the effort to get back to them after I reassemble everything means I really should replace the soft bits.

Here is a close-up of the tank’s filler neck.

1702-tank-filler-corrosion.jpg

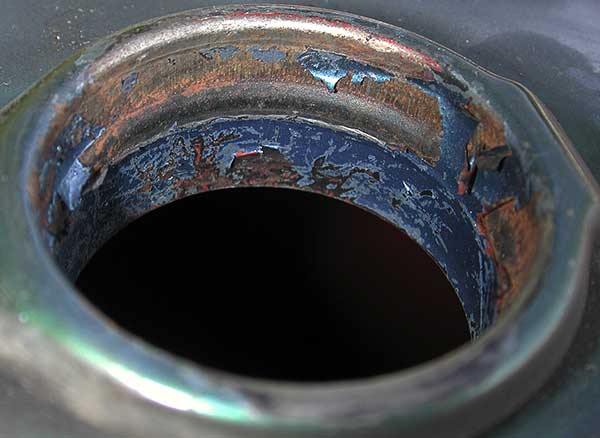
Yep, we’ve got crud. The factory lines the tank with a red-colored coating but that breaks down over time. I couldn’t get a good focus inside to show you but, yep again, the coating is going away and there were red bits captured in the carb strainers. This brings me to a variety of restoration methods people have used.

I read about putting a load of nails in the tank and shaking it like you’re playing the tambourine at a dance marathon. That doesn’t sound too appealing. Too much work. I also read about putting some lengths of chain in the tank, wrapping the tank in some linens, and tumbling it in a clothes dryer (no heat). Now THAT sounds like a winner. I do still see a couple of issues.

I emptied the tank a couple of days ago and set it in the sun a few times but I still smell gas. Just how smart would it be to tumble gas fumes in a dryer? I’m thinking I could rinse the tank with alcohol and that will evaporate more thoroughly. Any thoughts? Issue number two is what happens when my wife notices me tumbing a gas tank in the dryer with some of her favorite towels? It doesn’t matter which linens I pick, they are likely to be her favorites. I’ll work on a solution.

Lastly, I have to decide on what internal coating to seal the tank with. There are at least three available systems: Kreem, POR-15, and KBS. Those are just the ones I found in a quick search. I have no idea which is better than the others (I’ve heard of Kreem before, and I don’t just mean Eric Clapton). I call them “systems” because they come with multiple fluids to prepare the tank surface before the final coating. That final coating has to be something like an epoxy to withstand gasoline and thermal stresses. The tank should be sealed before any external painting because the sealing chemicals can damage the outside finish very easily.

I’m not entirely sure how to close the filler neck and two petcock openings while I slosh chemicals around inside. You can’t use the actual petcocks because they’ll get gummed up by the sealer if it gets in there. I’m thinking aluminum foil backed up with saran wrap, held on with rubber bands. Any better ideas?

December 31, 2006

Everbest

Filed under: 1973, airhead, BMW, motorcycle, R75/5, restore — Penforhire @ 9:01 pm

That title sounds like a bit of optimism doesn’t it? Or maybe a new Seattle band? It is actually the original model of fuel tank petcock fitted to R75/5’s. This is the switch that turns on and off the flow of gasoline from the tank to the carburetors. This bike has two, one on each side of the tank. They are mounted strangely, to my way of thinking, with a reverse-threaded nut forming what I call a ‘union joint’ to the gas tank threads.

Here I did get a bit of bad news good news. The bad news is Everbest petcocks are not considered rebuildable. If they fail or leak you toss them. Oh, there are some curmudgeons I read about who just don’t give up that easily (pry them open, cut some cork, mash it back together) but the repair manuals suggest aiming for the nearest trash can. The good news is my dad must have replaced them along the way with petcocks from 1974 or later, which are Karcoma’s. They happen to be rebuildable.

Good thing because both are overly stiff and one of ’em, guess which side, feels like rubbing two pieces of sandpaper together. Here’s a picture of the guts of one of them before I started cleaning up the pieces. The castings have some crudely formed spots that are a biatch to clean.

karcoma-petcock-1696.jpg

The shorter of two nylon tubes rising out of the body is the “Reserve” position. This is a very simple way to guarantee a certain amount of fuel is in the tank when you hit reserve. I like this system. Your bike starts sputtering and you reach down to flip the petcocks to reserve. A lot of modern bikes with automatic petcocks, like my FJR, just have an instrument light or indicator that blinks at you and/or starts counting miles to let you know when you hit reserve. The problem is you might not notice this until you are too far from a gas station!

After disassembly I sort of understand how this thing works. The two metal rings just right of the handle create a “detent” feel at every 90 degrees, that happens to line up with holes in the black gasket, shown left of the handle. You can see two holes in the base of the handle. The center hole drains down to the carb while the other hole rotates around to the four positions. Looking at the bent handle position — left and right are both “off” positions (dead-ends inside the petcock), up is “on” (to the longer tube), down is “reserve” (to the shorter tube).

Riddle me this, Batman. Why are there holes in the black gasket for the off position? Why not dead-end them to the gasket instead of cavities in the petcock? I honestly don’t know the answer. Room for trapped fuel expansion comes to mind but is not correct because the center hole is always open to the carb. Huh. One of the mysteries of life.

Notice the black plastic cover with white lettering on the right side? Well this is just a friction-fit and I’ll have to ask Joe how to remove it without damage. The plastic is soft and easily damaged by whatever I used to pry it off. If it makes you feel better, I did less damage to the second one I disassembled. Before final re-assembly I need to refresh the white paint on the lettering.

Motorcycling Man (Homo two-wheelis)

Filed under: motorcycle, restore — Penforhire @ 12:37 pm

Motorcycling man cannot live by wrenching alone. Today another riding buddy, Gary, invited me to a Norton club gathering in Pasadena. Gary happens to be my boss at work but, don’t tell anyone, he’s an honest-to-goodness riding buddy. Out on the road, if you don’t ride alone you should ride with people whose riding style is compatible and who will look out for you. Hmm, Joe used to work with us and I’ve even gone riding with our General Manager before his back surgery. Must be something in the water at work (no, our business has nothing to do with bikes).

We headed out from Gary’s house, sure was a crispy-cold ride over there at the crack of dawn. He rides a Honda ST1300 a near equivalent to my Yamaha FJR1300 (no silly, I can’t ride the R75/5 yet!). His wife Yvonne was on a new Piaggio scooter (500 cc’s, yow! But I forget the name, much bigger than her little Vino). Gary’s neighbor Joe (different Joe than, hmm, we’ll call him BMW Joe) came along on a Ducati MH900E, a recent retro-look bike. We’ll call this Joe “Ducati Joe.” Ducati Joe’s blood is the color of Italy because almost all his transportation is Italian. He owns a variety of hard-core Ducati’s (is a 998R hard enough?) and a MV Agusta F4 (gorgeous pipe-organ exhausts). That’s before you get to his not-every-day-cars, a Ferrari 360 Challenge Stradale and a new Maserati coupe. As exotic as all Joe’s hardware is, I have to admit that MH900E retro bike is some serious eye candy.

Today’s gathering was put on by a Norton club but they were far outnumbered by other brands. If I had to pick one, I’d say there were more Triumphs there than any other marque. Here’s a shot of part of the crowd. There were more bikes behind me and about as many again across the street. I’d say around sixty in total. Since I changed this blog format I think I can fit full-size pictures in-line. Here goes —

club-gathering-1687.jpg

Here’s an Indian that made me feel good. It needs about as much work as my R75/5, though it obviously runs.
indian-1680.jpg

Here’s the strangest rig I’ve seen in a while. This is a 3-wheeler with a front-mounted Moto Guzzi engine. It was parked in too tight to the bikes to get a clean picture. I wanted another angle but too many people on the sidewalk and too many cars on the street.

moto-guzzi-3-wheeler-1682.jpg

I’m told this next bike is one of the rarest present, a model of Moto Guzzi known as the “meat slicer” because of the exposed flywheel (couldn’t get a good angle of the left side here). One of these was shown in the traveling Guggenheim “Art of the Motorcycle Exhibit.” I saw that exhibit when it was in Las Vegas at the Venetian hotel/casino a few years back.

meat-slicer-guzzi-vertical-1691.jpg

This bike, a Vincent, was one of the cleanest restorations I have ever seen. It would not look out of place in a museum (or my living room). I was amazed at how pristine this bugger looked. I don’t see how I could ever get my R75/5 looking as nice and I can’t imagine how much harder an old Vincent is to restore than mine! I am trampled in the dirt by this magnificent restoration.

immaculate-vincent-1686.jpg

I spoke to the owner of this excellent-condition R90/6. I told him I could use some of his parts. Understandably, he was relutant to part with any but he said he had some spares in his garage. Don’t we all?

r90-slash-6-1694.jpg

I never found the owner of this beautiful older BMW. I am not sure but it might be a R60/2. If anyone knows for sure please drop me an e-mail or comment. Once again, I am humbled by this stunningly clean-looking restoration. There were many super-clean bikes at this gathering but, of course, this one sort of sets my compass.

bmw-r60-slash-2-1695.jpg

I hope you enjoyed this day of kicking tires. I’m sorry I could not record sound clips for you because some of the exhaust notes were pure music. It is hard to go back in the garage right now after flying down the road and seeing the sights.

December 30, 2006

Who put the baby in the Bing?

Filed under: 1973, airhead, BMW, motorcycle, R75/5, restore — Penforhire @ 5:56 pm

It sure was a good thing I started with the right-side carburetor. That way I had some clue what was going on. If I had started with the left hand side I’d be much more panicky. Why the difference? I think it was rainwater that somehow flooded the left carb since the sidestand leans the bike over to the left.

Here’s the main needle. This gave me a hint of what was to come later.

bing-needle-crud-1675.jpg

A little further into disassembly I notice something dripping on my hand. Who put baby puke in my carb intake? The picture is a touch out of focus but that white wet goo is what I’m referring to. Hmm, doesn’t smell like gas or much of anything else either. But sure does feel slimy!

baby-puke-intake-1678.jpg

Here comes the low point. When I opened up the float bowl some brown slimy stuff oozed out. Parents, don’t let your kids take a dump in the carburetor. Just nasty.

baby-shit-interior-1679.jpg

After disposing of this crap in an ecologically sound fashion (sure hope the dog doesn’t lick there) I continued to discover various parts completely corroded into uselessness. If I had not seen semi-okay carb guts yesterday I would have thought the gas was metered by a Play-Doh factory. Now I might have mentioned that I have a carb rebuild kit on order. But the thing is that kit only includes some gaskets, diaphragms, and o-rings. Not any jets, needles, or other goodies.

Whatever will our hero do? Cry about it to Joe, who happened to be gathering some of his spares to bring over. Here’s a picture of four boxes of goodies Joe brought over today.

joes-magic-boxes-of-parts-1674.jpg

Four magic boxes of stuff. What kind of stuff? If you look to the lower right you will see two completely rebuilt Bings. The EXACT P/N’s that match mine. I don’t need to touch those because elsewhere in the magic boxes are a bunch of used-but-not-gooey carb parts! And a long swingarm (to convert a /5 SWB into a /5 LWB) and rockers arms and wheel axles and center stand and … Well, you get the idea. He needs to dig a little deeper in his garage to get at a LWB sub-frame, spare mufflers and more.

I’m not convinced I want to convert this into a LWB but most people liked the difference. When this is over Joe might own half this bike.

December 29, 2006

Badda Bing!

Filed under: 1973, airhead, BMW, motorcycle, R75/5, restore — Penforhire @ 11:13 pm

Okay, so Tony Soprano’s strip club might be more fun but I’m stuck with Bing constant velocity (CV) carburetors instead. I figure they’re a couple of the most obvious parts to pry off and, um, evaluate.

So here’s the right side carb just after I popped it off and removed some of the screws on the cover. Haynes’ manual sort of sucks but Clymers’ is better. It has more pictures of the various parts to wrench on. Neither of them prevents a certain amount of head-scratching, “oh, so THAT’s how the throttle cable comes out of there!” It also took a manual impact wrench, love that hammer, to loosen the cover screws. Not a good sign. Click on the thumbnail for a larger image (that’s how I’m setting up all the images from here on).

whole-bing-carb-1666.jpg

I know, I should not be too surprised yet. Here is one of the hose clamps on the intake to this carb. Notice the lovely patina of rust. What happened to stainless steel clamps? Doesn’t that sound like a good idea?

corroded-hose-clamp-1669.jpg

Well, after a certain amount of effort and a small blood sacrifice later, these are the guts of the horrible little monster (see pic below). May make small children and mechanical idiots cry. There are far more parts than I can see any reason for their existence. There are three or four o-rings on parts but all of them feel hard as stone now. Oh well, I anticipated needing a “rebuild” kit with gaskets and o-rings. Hey, the choke’s gasket looks pristine. So how come the repair manual says to replace it? Probably got compressed but… don’t be thinking that much dummy, just follow instructions!

exploded-carb-view-1670.jpg

Many of these odd parts are gummed up or otherwise nasty (but not the white floats on the right side of the pic, yay!). Here’s where I cry on your shoulder about how you can’t find good carb cleaner. Once upon a time you could buy a wonderful chemical cocktail called Chemtool B12. I think they discovered it caused two-headed babies. So now-a-days I seem to be limited to stuff like Gunk brand cleaning fluid. I dipped the main carb body in that stuff for a few hours and the gooey nasty stuff mostly laughs at that, thinks it is going to the spa maybe.

Not all the parts dropped out during disassembly like they are supposed to either. I had to scrape away goo and coax various bits. Here’s my first casualty (see pic below). This is the main jet holder, if I navigated the repair manual’s drawings correctly. It did not want to unscrew regardless of the amazing force I brought to bear on it. It ignored my box-end wrench. It didn’t care that I soaked it in “Liquid Wrench.” It certainly didn’t move when I pounded it with a 10 mm socket on the end of my impact wrench. I tried icing it while heating the carb body. No go. I started to get, uh, enthusiastic with the impact wrench and that’s when I noticed the six-sided nut-shape starting to round off. Uh oh! Time to slow down and drink a beer. I got on the phone with Joe, my lifeline.

mashed-jet-holder-1671.jpg

Joe figured out that one of my problems was my “12-point” wrench and socket. Some of you are slapping your foreheads at my ignorance but, excuse me, it seems that 12 point tools do not distribute loads across nuts as well as 6-point tools. Huh. I’d heard some vague thought like that before but filed it away in the mostly useless mental file. I mean, my 12 point tools got me where I am today. Nearly FUBAR. Anyway, Joe came over and rescued the bent critter from me, took it home, waved his 6-point wrench at it, and brought me back the separated parts.

I went to Sears and got a set of 6-point wrenchs today. Shhhh. Don’t tell my wife. Can you imagine trying to explain why I needed to buy something that does exactly what something else I already own does?

Stay tuned. I can’t promise any regularity to my updates. I’m on Xmas vacation this week so my progress is phenomenal now. The tortoise returns in January. I will leave you a parting scary image. The photo below shows the corrosion or crud in the engine intake AFTER the carb. Hmmm, the engine must be yummy!

cylinder-intake-crud-1673.jpg

« Newer PostsOlder Posts »

Create a free website or blog at WordPress.com.