Brad mentioned that the weatherstrip adhesive I used to attach the gas tank panels is known in certain circles, he used to race motorcycles in the desert, as gorilla snot. How descriptive! It is yellow, thick, sticky, and hard to remove from anything it gets on. What I found especially intriguing is there is at least one other common use for that name. Scuba divers refer to a certain type of face mask anti-fog fluid as gorilla snot too, mostly for its viscous feel. Makes you wonder how the term originated. I don’t know anyone who’s actually touched the original reference material…
BMW Joe called me and said, “yep, that signal harness goes through the fork tubes.” (also see the comment Tom made on the last post). After sleeping on my wire routing problem I decided if I’m doing this job I have to make every effort to at least avoid obvious errors. So I removed the mis-routed harness. I tried “fishing” a thin solid wire through the fork tubes. I figured if I could get a wire through I could attach the harness to it and pull it through. Well that was entirely unsuccessful. There were just too many turns required to work a wire from either opening to the other. Oh I tried for a while and exercised my curse word vocabulary but no joy was had.
Off came the fork caps, loosen the fork pinch clamps, down go the fork legs, and then I could easily fish that solid wire from opening to opening. The harness itself is too floppy to push through unless you have the fork tube completely off (I didn’t). I wrapped a little masking tape to link the two harness wires together and managed to pull them through. Up go the fork legs (making sure the harness is not pulled), on go the fork caps, back in business. Sort of.
Here’s a picture of the grommet on my new turn signal harness, intended to seal the upper hole in the fork tube.

Thing is, that grommet is about twice as big as it should be. The harness barely clears the hole with just the shrink wrap under the grommet. Believe it or not, I know how to install a grommet. A properly sized grommet is a tight fit and has to be worked in about 1/8th of a lip at a time. This isn’t a tight fit. This is the impossible dream. Since I powder coated the fork tubes I know the hole lost something less than six mils of diameter, not enough to be the cause. I assume that some later years of BMW airheads have larger holes in the fork tubes.
Sigh. Time for Plan B. I carefully cut half the grommet off (the half facing the hole) and whip out a tube of silicone sealant.

I put a bead of this around the back of the remaining grommet rubber and shoved it against the hole. We’ll see if it holds up. I can always re-seal it. I know, I could have pulled the harness BACK out and enlarged the hole. I probably should have done that. But I just thought of it as I’m writing this so we’ll see if the RTV holds up.
If you read my comment under my own last post you know I found that wheel spacer. It was much smaller that I thought it would be. I had a brain fart over the spacing of the axle in the wheel and the wheel’s position between the forks. Oh, and how the front brake’s central hub resists force. The spacer was only about the size of a large washer, almost identical the washer under the axle nut. And it doesn’t touch the innermost axle sleeve of the brake. That sleeve has its own lip on the left side so the right side can be pressed as hard as I need to without moving that sleeve.
So wham, bam, and the wheel is on.

No, the axle didn’t just fall all the way through without some tapping. So fork alignment is not perfect. It wasn’t perfect even when I didn’t have the wheel in there. Get over it. You may also notice the oranege strap on the right of the photo. I got smart and used a tie down to pull the center stand to the front of the frame. If the center stand can’t fold backward it won’t move at all! It would have made things easier earlier but I’m getting close to putting the engine back in and it’ll be critical not to have the bike roll forward on me then.
I decided to take a look at my handlebar switches. I had a thought to take them apart, clean them up, and use them again.
Here’s one of two e-clips holding things together, this one on the spring.

Here is the second e-clip, on the central post. You have to press the switch together, as if you’re blowing the horn, to get the clip positioned to remove it.

These e-clips are also know to mechanics as Jesus clips. That’s because if you’re not careful when you pry them off they fly across the garage and bounce around, never to be found again, followed by your choice of profanity. Memory is a funny thing. I was inspired to take a look at the switches by an article on the Internet BMW Riders board (see link in my list) written by Jim Buchanan. I read this a long time ago and filed it away mentally under “things to try.” So I go ahead any try this without re-reading it and I even managed to steal his Jesus-clip note without intending to. Yep, that was in Jim’s article (I thought to check before publishing this post). Now how can I manage to do that and yet fail to remember so many more important things?
Now here’s the guts of the switch cap.
The spring presses that three-tabbed contact against the wiring block, as seen in the next photo.

At this point I decided my switch materials were too brittle and corroded to want to re-use. I ordered new switches and harnesses. But I hope the photos help someone “out there.” They happen to cost about $90 each (ouch!).
Now I discovered another challenge in my wiring. I have a new engine harness and I grabbed it, thinking to use the old harness (still connected to the starter relay) to help identify some connections. The starter relay is somewhat sophisticated in that once the engine starts spinning it uses the power from the generator to prevent the starter from engaging. So it has a bunch of connections. Anyway, as soon as I compared harnesses I discovered an issue.

New harness on the left, old harness on the right. Some of the wires that were green in the old harness are now blue! Gee, that’ll help me use the schematics, eh? I added some masking tape flag notes on the “changed” wires and set them aside, shaking my head.
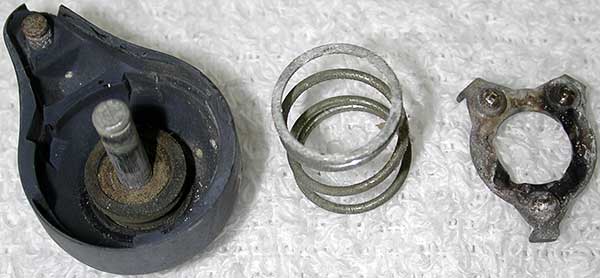
You already know that when I get frustrated I switch to polishing something. Well here’s the nasty original horn.

Here it is halfway through clean-up using Nev-R-Dull wadding.

It took a long time since that wadding is gentle and the pitting on the horn is at the limits of cosmetic possibility. But I think I got it to where I can put off buying a new horn.
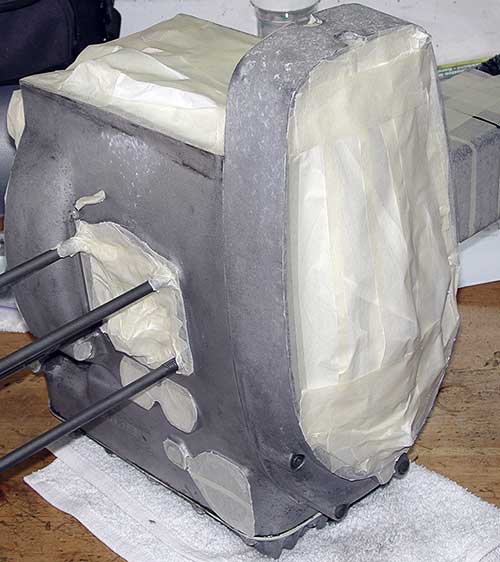
I’ve been putting something else off for a while and this holiday weekend was the right time to get-r-done. I needed to bead blast the main engine case before I could put it back in the frame. But I had two issues. One, it would not fit in my blas cabinet. Two, it has so many openings that extreme masking is required to prevent glass powder from coating the inside (that’d be like letting fine sand go through the air intake without a filter in place).
So I sat down and masked the heck out of the case. Here’s one side, showing how I used a trash bag to help mask the cylinder opening.

On the other side I tried straight masking tape.
Then I extracted the blasting gun from my cabinet and used a jug of media to free-blast in my driveway. Even wearing a hat, goggles, and a dust mask I got covered and stung by glass grit. It took about 10 lbs of grit (maybe $20 cost) to get the job done without recycling grit as you would in a cabinet. What a dirty job! At least I was smart enough to park our cars at a healthy distance. I’m need some rain to help hide the white media blown all over the foliage on one side of the driveway. In theory it is no more harmful than fine sand. No matter what I wear I always get some in my eyes. Very irritating. Here’s my hot tip, despite the convenience of doing it as needed pay someone else to do this sort of work!
I set the much-better-looking engine aside. I was only partly successful at masking out the grit. Some still got into the case. I’m working at cleaning out as much as I can get. Maybe two quick oil changes will flush the rest down to a safe level?
Here’s my choke. I bought new cables so a teardown and cleaning was due —

Here’s the guts.


Fairly simple arrangement. You just have to engage the slotted drive lever at the end of travel (capture-rods all the way in) so the assembly works.
Somewhere along the way I had to make a blood sacrifice.

I don’t report evey one of these because I bleed just about every time I work on this bike. But this was so especially bright red it made a nice image. The funny thing is you can’t judge the amount of pain by the amount of blood. I’ve had deep dripping wounds that didn’t hurt much and then some non-punctures that made me hop around the garage saying bad words. Go figure.
Here are my foot pegs, minus old rubber.

What is wrong with this picture? Well, mostly, I don’t think they are supposed to be different lengths. They mount to the rear engine cross-bar. The bar is perfectly square to the frame. So is one foot supposed to be a couple of inches ahead of the other? Doesn’t seem right. The repair manual are useless for this. Clymers only notes that I could fit pegs from many different year of bike. Gee thanks.
Well I figure the right way to tell what goes where is to mount the rest of the pedals (rear brake & shifter) and see if a certain peg spacing works best. So I mounted the rear brake pedal and roughly adjusted it. You won’t be surprised to hear I’m missing a washer on the outside of the pivot point. Hardware just keeps vanishing!

You can also see new passenger pegs mounted directly to the subframe. The repair manual shows a bracket of some sort but I know mine were originally right on the frame?
At this point my neighbor’s rented jumpee was inflated —

Yep, time to go get blitzed and celebrate our independence (this was Saturday night, I have to sharp at work so Wednesday celebration was mild). Neighbor David throws good parties. Julie made macaroni salad and I think she didn’t poison me this time.
Back in the garage, I was missing a big bolt.

This year of /5 has a double-cover on the oil filter. Inside, that round cover is screwed over the filter. I have no idea how a fat M10x1.00 metric bolt grows legs and walks away but it did. In my collection (and Joe’s bag-of-bolts) I had plenty of M10 x 1.25 or 1.50 thread pitches. But none of the 1.00 mm fine-pitch. My kingdom for a M10x1.00 bolt! Fine. Off to my local hardware store. Nope, they didn’t have it either. Canning’s hardware was sure to have it but they’re so far away! I’d visit them at lunch during work if I had to go there. So I checked a few auto parts stores and voila (!) —

Would you believe this cost $1.96? Thieves! And I know that bolt will show up eventually. Grrr.
Here’s me cleaning out the last bits of gasket from the points area.

I bought a length of new square gasket and it fit right in there. Something that actually went smoothly? Not possible.
Phew, that’s all for this week! I’ve got a Tivo’d Formula One race to watch. I figure Lewis Hamilton to win for McLaren Mercedes, from the pole, in front of his home crowd in England but Kimi or Massa over at Ferrari might want to spoil that… or even his teammate, reigning world champion Fernando Alonso (whose ex-Renault team is struggling mightily without him). And poor Scott Speed, the lone American driver, over at Toro Rosso (Red Bull, ex-Minardi team). Will he ever finish a race? Will Takuma (Taku!) Sato at Super Aguri (Super Friends), the hand-me-down Honda team, continue to beat up on the factory Honda team and the oh-so-overrated Jenson Button and oh-so-overpaid Rubens Barrichello? Will one of the Spyker drivers do something amazing, like Christijan Albers dragging the refueling rig down the pits in France last week (the “lollipop” never moved)? Will Toyota’s massive investment ever pay off? Will “Quick Nick” Heidfeld at BMW Sauber be quick enough for a podium? Will the oldest man on the grid, 36 year old David Coulthard at Red Bull, put his foot in his mouth again (“I’m just as fast as Lewis Hamilton”)? This is my favorite soap opera!

Eric,
Congrats on getting this back together, it’s looking like a bike again.
I wouldn’t get the sand out with oil changes, I think changing the oil is too late. Get the sand out now!
Comment by Bob — July 9, 2007 @ 7:47 am
Looks good. Yes the foot pegs are different lengths is normal. Remember one clyinder is slightly ahead of the other, hence one carb is ahead a bit so to avoid a worse shin bruise than usual they are off set.
Regarding your switches, $90 each is a waste of money. Yours don’t look that bad. Let them soak in something for a bit and then wire brush things. With a soldering iron give them a new coat of solder without melting the plastic and solder in new wires. Then with a nice center punch make a divet in the new solder while making sure you have something to back the switch so you don’t break the bake-a-lite/plastic. They can be rebuilt it’s just a small detailed job that requires some conentration but mine work like new!
Masking the media blasting is difficult. If the blasting media can clean aluminium in can surely rip through masking paper. Naturally you should have cleaned things up beforing installing parts, but now you should for sure try to flush out the rest of the grit. The stuff is designed to tear though material and it will do its job when its in your oil being smashed between two metal bits.
Good luck!
Comment by Toby — July 11, 2007 @ 9:07 am
Oh if you do end up rebuilding your switches a small drill is helpful if you want to replace the rivets or drill a small indent in your new solder. (To get the right “click” feeling) Also pack the thing with electical grease when you are done to prevent water from doing some more damage in another 30 years.
Buying 6 e-clips is highly recommended and having a good set of micro needle nose pliars and screwdrivers.
I wired my blinker switch as a run-stop switch (I just hand signal, the blinkers look goofy anyhow)
Comment by Toby — July 11, 2007 @ 9:14 am
This site is awesome. I continuously run into new stuff & unique listed here. We appreciate you that details.
Comment by Brigham — September 13, 2011 @ 9:14 am
were did you buy the square gasket. i need to replace the gasket and the part is no longer made according to bikebandit.com
Comment by Frank — April 30, 2013 @ 10:45 am
Hello Frank! I don’t recall where I got that particular part but if I were you I would check with Bob’s BMW (in my list of links above) or some of the other larger BMW dealers.
Comment by Penforhire — May 1, 2013 @ 7:25 am