I was right about the chances of my poker hand holding up.
Now while I AM pleased to win, why couldn’t it have been one of the runs where the prize is a pair of new tires?! I shouldn’t complain. Not only is this a better trophy than the ink jet print-in-a-glass frame I got for my last win but I’m more likely to get a traffic ticket on one of these rides than win it.
Here are my Bing carbs.
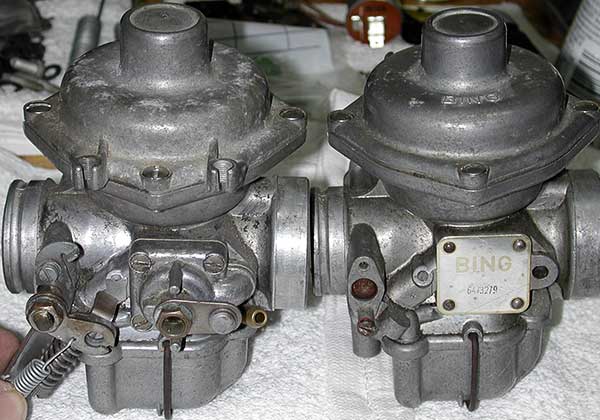
Remember way back at the start of this adventure, how I spent all that time cleaning and rebuilding these? Funny but now the exteriors look too rough compared to the bike I’m mounting these on. I probably should have bead blasted these. I set all the jets to nominal starting positions based on the service manuals and leveled the floats. I have no idea if these carbs will work but we’ll find out soon.
Here’s the airbox outlet on one of Joe’ spare parts.

Hee’s that same outlet on my airbox.

Notice that I’m missing the o-ring that BMW must have designed on later bikes. Too bad because that looks like a good idea. It was a serious struggle to get the carbs mounted.
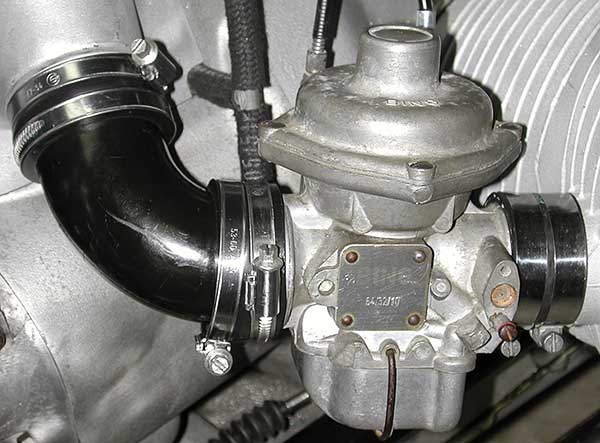
There is a rigid plastic elbow between the carb and the airbox and everything fits so tightly together. Why couldn’t BMW use something flexible there? If they didn’t like rubber then make it corrugated for flex, upsize it if you’re worried about air restriction. Oh yeah, even the BMW-specified hose clamps were a problem.
![]()
Looks nice, with that BMW logo, right? But the sizes were such that getting them each started over the coupling hoses was a finger-munching exercise, whether I slipped them on fromt he sides or opened them completely. I guess they didn’t want too much clamp free tail after tightening but this was just ridiculous. After my fingers were nearly useless (again) I used a couple of larger generic clamps on the left side.
After I got my clutch cable routed I tried to verify it was not binding. I was concerned because the pull required was studly. I recalled it always being stiff but I was worried about just how strong that spring tension felt. Joe assured me they really were absurdly stiff and folks rarely kept the clutch disengaged at stop lights. Darn thing felt like a hand exerciser! Well, that meant it was time to whip out the Easy Clutch from Bench Mark Works. I understand there are a variety of these devices but Craig Vechorik’s is what I think of first.
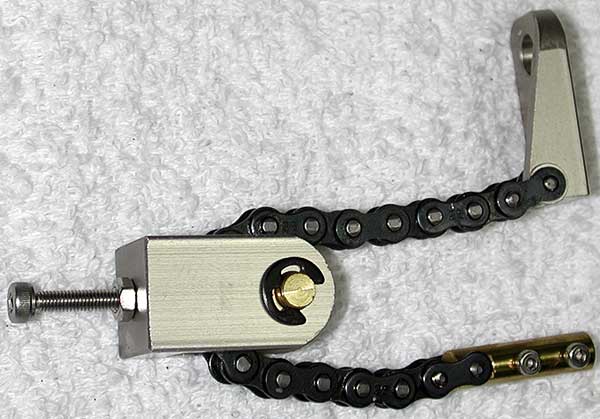
It is a straight-forward pulley system. If I remember my physics classes correctly it doubles the travel of the hand control, halves the effort, and halves the motion at the clutch. The issue is if the clutch engagement varies too much, say when it warms up or stretches, I may need to chase clutch adjustment. It didn’t feel right but I had to cut my brand new clutch cable back about 4″. The cut end gets inserted into the brass sleeve (seriously tight fit) and held with three set screws. I worry about those set screws but the cable pull should have half the tension on it that it had before.
Seems to work fine in the garage. Makes the clutch motion just stiff instead of “you’re shitting me, right?”
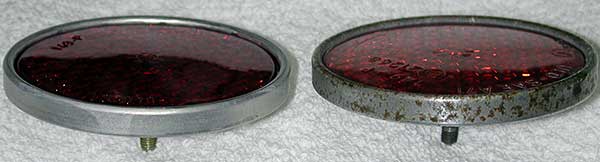
I mentioned some of the cosmetic parts are still rough on this bike but the tail reflector was bugging me so I splurged on a replacement. I still need to buy new headlight ears because of similar rust and dings I can’t improve enough.
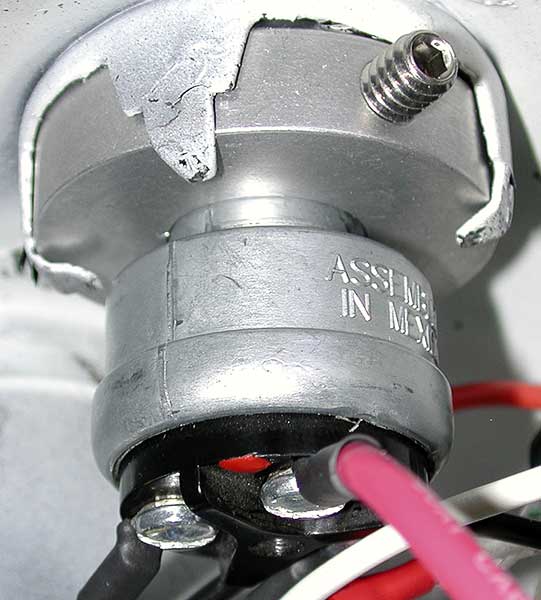
Here is the ignition key kit from Stan at Rocky Point Cycle.
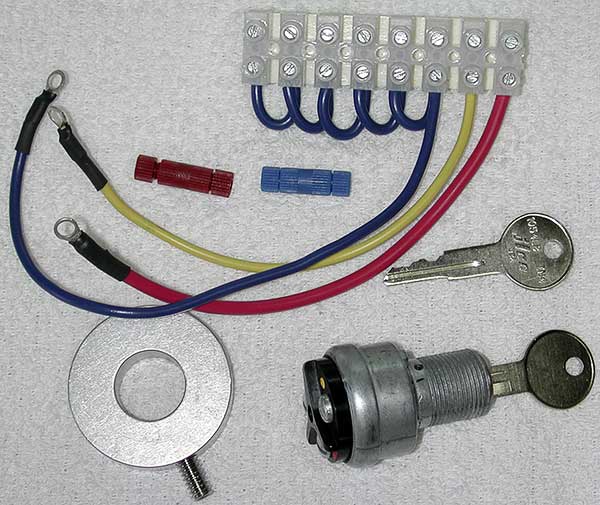
This is designed to completely replace the super-funky original switch but leave the bucket exterior stock look. It’ll also prevent anyone from starting the bike with just a 10 penny nail, as Joe related anecdotally.
The first piece is a collar that you wrap the original bucket tabs around.
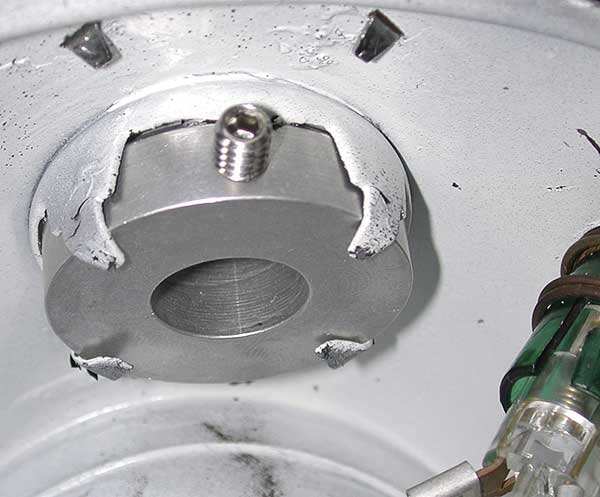
Here’s the switch part, inserted into the collar and held with a set screw. As mentioned in the instructions, I had to grind the metal key opening larger, underneath the sliding plastic cover.
I should note that while the kit comes complete with some nice Posi-Lock connectors I was forced to use my own Posi-Lock stash because the OEM wires were too big to use Stan’s included parts for the ground and horn connections. All the remaining connections go to the new terminal block in this kit. By the way, this new terminal block is great. It uses a non-rotating clamp under a screw instead of the OEM bare set screws. If I have any trouble with the OEM block I’ll be looking to replace it with something like this.
Here’s a long shot of the bucket at this point.
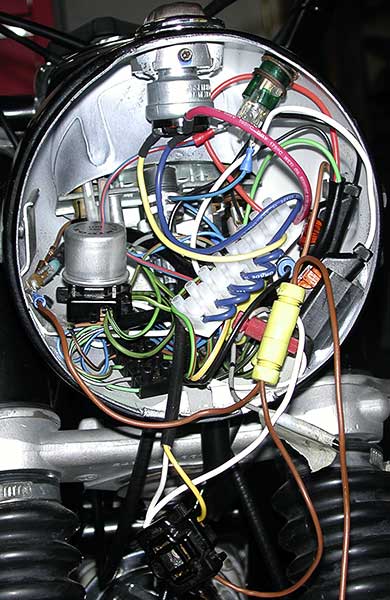
And here’s a closer view of the messy spaghetti inside. I need an elf to come clean it up for me because if all my connections are good I’m not touching it.
Here’s an exterior view of the bucket and you can see how the ignition switch appears unmolested.
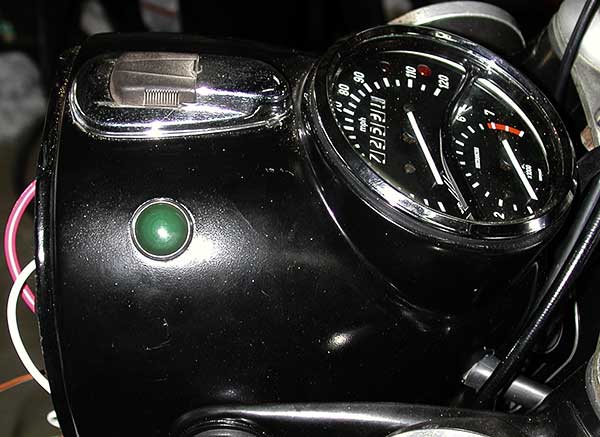
The key switch has three positions, extremely similar to the original switch, allowing the engine to run with or without the headlight.
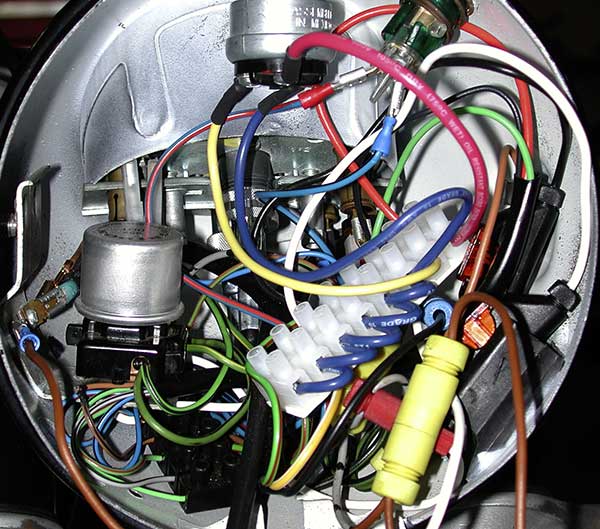
Now I went to fit the gas tank and I discovered that not only is the wiring under the tank too messy but the EnDuraLast regulator/rectifier will NOT fit in the OEM location as planned. I had to move it foward and down.
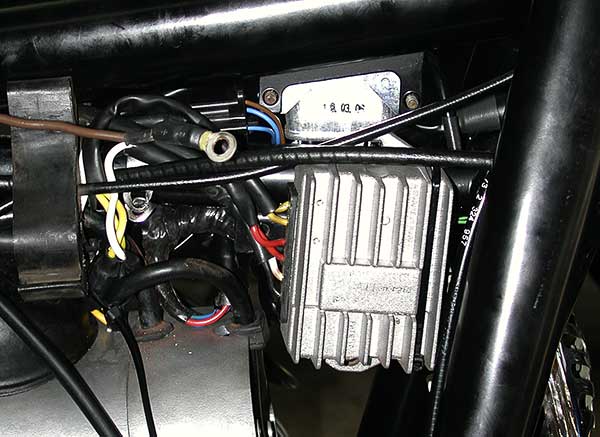
By turning it 90-degrees it also made it easier to use just tie-wraps to secure it. I also had to extend the brown ground wire and use a new bolt-and-nut to ground its case. Then it was just a matter of making the wiring bundle a little tighter. I had to pull the speedo cable out of the tranny (again) to pass it on the other side of several wires. Then voila!
You might notice the stunning Keihan stainless exhaust pipes now mounted too! There is a small dimple on the left pipe but I can’t see sending ’em back to Stan because of it. We’ll see what he says.
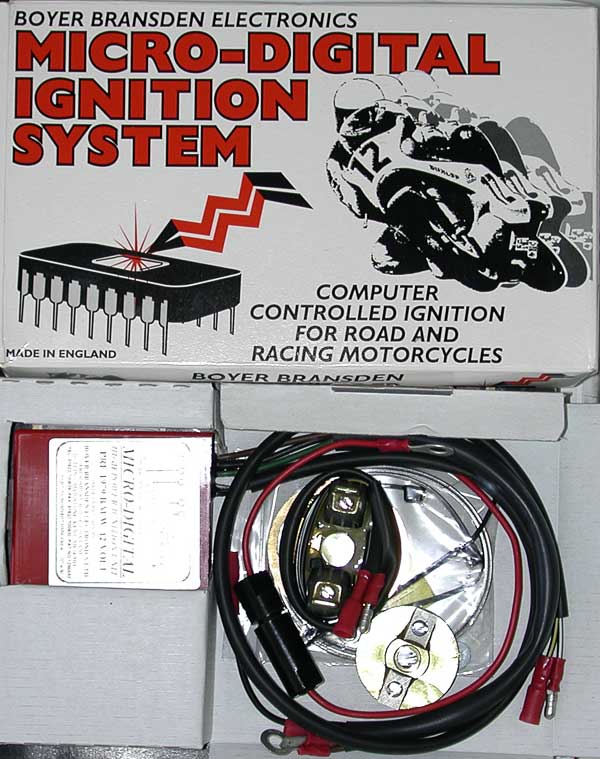
The repair manual talks about removing the seat to remove or replace the gas tank. Nuts to that! It slides in place just fine with a little careful twist from the side. I need it to be easy to remove since I have to get back under there when I install the electronic ignition later. Here’s a teaser preview of those parts.
So now I’m down to just a couple of things that need doing before I try starting the bike. Technically I could try to start it but the headlight is not mounted to the bucket, two exhaust hangers are not secured to the engine/peg mounts, and the front brake cable is not mounted in the far arm. That’s it. When I got to tasting the finish last week it drove me to wrench harder after work this week, despite our local heat wave. I could hardly sleep, dreaming about getting it all done. Friday was my birthday and I took the day off to spend half with my wife (who works a 4 day/40 hour week) and half with this bike. I worked until I was completely spent, sore everywhere and filthy from rolling around the garage floor.
I’m frustrated by those three things left to do so I called Joe and begged him to come over this weekend whenever it was convenient to give me an hour of his time.
1) There must be a trick to the headlight ring that I’m not getting. It hooks at the top of the bucket and has a spring latch at the bottom. But seeing and doing are two different things.
2) I just need a little more muscle, two more hands, to push new springy exhaust hangers onto the engine/peg bolts. I can’t quite get a C-clamp to work in there.
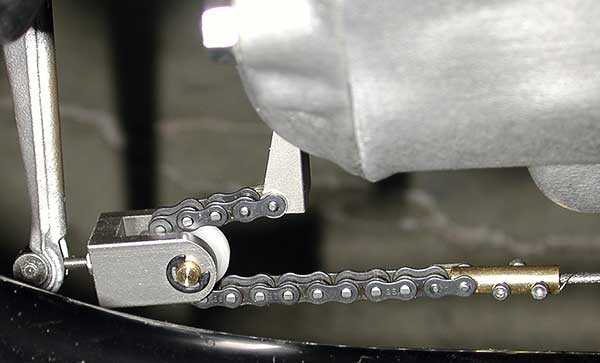
3) The front brake cable is insane. I adjusted the cam spreader to its minimum but the forward arm is still just “a bridge too far.” Gary helped me wrestle with it last week and we got close but no cigar, maybe 1/8th inch away from starting the end-adjuster nut.
I just need to do those three items, fix whatever else I did wrong (probably some incorrect or poor crimps somewhere), do a checklist shortly after starting up (timing, balance carbs, re-torque head, valve adjust, fluids change, verify charging system), install the Boyer ignition, and bolting on the front cover. Hard to believe I’m THIS close to engine noise! I also got my first scratch in the paint. It is on the rear fender from the negative-side battery strap as I was yanking it into place. That won’t seem like much after the first time I drop the bike but right now it feels like a lot.
While I’m waiting for Joe to call I got a wild-hair idea. Idle hands and all that. I took the original key —
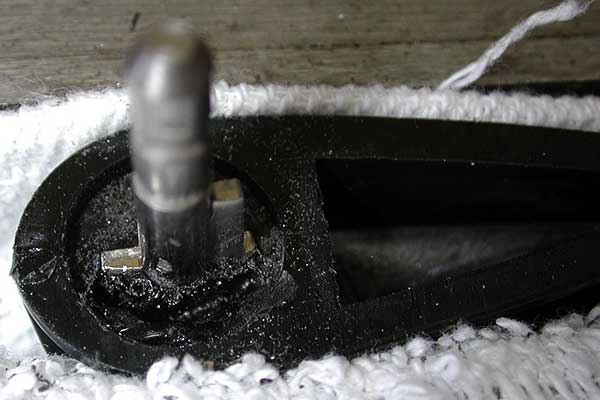
And I used a small Dremel abrasive bit to cut around the metal. After I cut away enough plastic (or glue?) I was able to pull out the bits —
Here’s the remaining plastic shell.
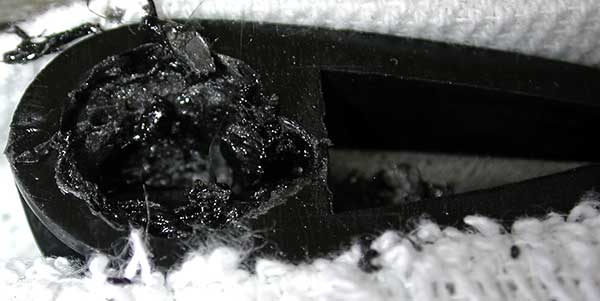
I was careful not to cut through to the other side and I was gentle pulling out the old key bits to avoid cracking the shell.
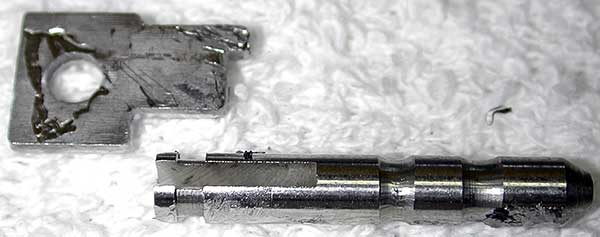
Here’s what one of the new keys looks like.
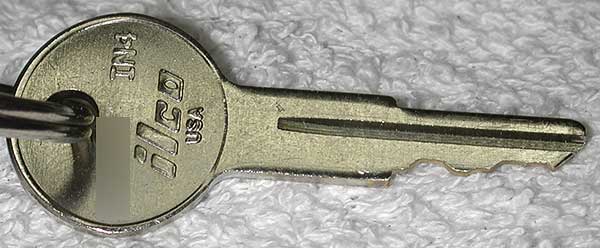
Yeah, I blurred the key code. Not that I don’t trust you guys but who knows who’s watching? I didn’t blur the key cuts because if you can reproduce this just by looking at the cuts then I’m not slowing you down much in any event, eh? Anyway, I went ahead and started grinding the head of one new key in a vice with a hand file until it fit properly in the old plastic shell. It took lots of back-and-forth test fitting in the ignition.
I mixed some 5-minute epoxy and poured it around the new key in the old shell.
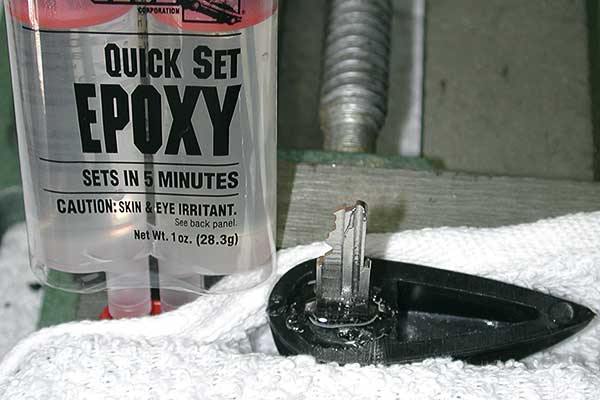
If I did this right you won’t be able to tell I’m using a new key system when it is inserted in the bucket! How cool is that?
Okay, since Joe’s not on the way yet and to scare me straight, I promised you a better list of expenses. Here you go. These do not include any items under $3 and I probably missed a few items that belong on the list, say $100 or so. Also, I do not have saddlebags yet and if I go for new Hepco & Becker replicas they’ll cost me another $450. So we’re awfully close to a round $10K. Sorry about the formatting. I haven’t figured out how to properly insert a spreadsheet in a WordPress blog —
“Restoration expenses, 1973 BMW R75/5 in decending order
By item (smaller items not inc. tax or ship) Cost
Painting service (fenders & tank, with all prep) $835.00
Keihan /5 mufflers $595.00
Wheel lacing parts & service & tire mount service $594.00
EnDuraLast charging kit $469.00
Keihan 3-pc stainless headers $385.00
Pistons & rings (overbore set of 2) $358.00
Speedo & tach restoration service $353.74
Sargent Classic seat $319.90
Complete valve job labor $295.00
Tires & tubes $254.00
H4 headlight conversion $249.95
Rear shocks, Progressive (2) w/springs installed $249.95
Powder coating service $225.00
Stainless bolt kit $185.00
Boyer Microdigital electronic ignition $179.95
Centerstand $175.00
Rubber kit (hand grips, foot grips, etc.) $166.50
Valves (intake & exhaust, 4 total) $155.40
Polished spoke& nipple kit, front wheel $135.00
Polished spoke & nipple kit, rear wheel $135.00
Clutch plate $103.95
Lace & true front wheel $97.00
Lace & true rear wheel $97.00
EZ Clutch $95.00
Bore & hone cylinders (2) $92.00
Handlebar switch, left $90.85
Handlebar switch, right $90.85
Head exhaust thread repair $90.00
Tank emblems (2) $85.90
Ignition coil $77.39
Ignition coil $77.39
Progressive fork springs $69.95
Battery $68.00
Lock set (steering head & seat) $65.00
Hub cap $63.91
Main wiring harness $61.95
Starter relay $54.39
Wrist pins, lightened (2) $52.00
Beadblast cylinders & heads $50.00
Front end (forks) rebuild kit $49.95
Engine wiring harness $48.59
Top end gasket kit $48.00
Tune up kit (plugs, filters, gaskets) $45.90
Carb rebuild kit $45.00
POR-15 gas tank repair kit $42.50
Speedometer cable $40.39
Tachometer cable $40.39
Ignition switch kit (Stan’s) $39.95
Clutch diaphragm spring $39.59
Exhaust clamp rings (2+2), fit on headers” $39.56
Fuel petcock $36.25
Muffler brackets, stainless $34.48
Front seat hinge $34.39
Valve springs $31.60
Exhaust hangers, stainless $29.90
Mount front tire & tube $27.00
Mount rear tire & tube $27.00
Clutch cable $26.10
Wheel/swing arm bearing BR30203 $25.88
Wheel/swing arm bearing BR30203 $25.88
Wheel/swing arm bearing BR30203 $25.88
Wheel/swing arm bearing BR30203 $25.88
Bearing BR32 (steering) $24.44
Bearing, steering $23.95
Front brake cable $23.95
Wheel seals (2) $23.90
Wheel seals (2) $23.90
Throwout bearing (ball cage) $23.77
VIN plate & rivets $21.25
Valve seats $20.00
Fuel line (2 meters) $19.90
Wheel seals (2) $16.94
Battery straps (2) $16.80
Starter rebuild kit $16.80
Throttle cable $16.39
Wheel bearing (extra BR30203, other vendor) $16.10
Wheel/swing arm bearing $16.10
Wheel/swing arm bearing $16.10
Wheel/swing arm bearing, extra (destroyed one) $16.10
Spark plug wires, 5 K-ohm $15.95
Throttle cable, for USA bar $14.95
Turn signal flasher $12.95
BMW Microlube (clutch spline lube) $12.39
Gas cap gasket $12.19
Fork oil $11.99
Flywheel bolts (5) $11.00
Choke cable LH $9.59
Choke cable RH $9.59
Alternator rotor bolt $9.39
Push rod seals (4) $8.80
Timing advance spring set $8.50
Hand control perch (wedge) $8.10
Turn signal gaskets (4) $8.00
Driveshaft boot $7.85
Oil pan gasket $7.25
Hypoid gear oil $6.82
Swing arm seals $6.40
Driveshaft bolts (4) $5.80
Tach drive seal $5.70
Turn signal bulbs (4) $5.56
Clutch rod seal $5.00
Clutch rod felt $4.55
Front tank support (rubber) $4.39
Brake spring $3.20
Total $9,180.28
“I know what you’re thinking. Did he fire six shots or only five? Well, to tell you the truth, in all this excitement I kind of lost track myself.” Sounds like Dirty Harry was my accountant on this project.
The work continued because Joe stopped by! Yes, those exhaust hangers were really a two-man job. My new headlight needed a small tweak in the chrome ring before it would pop on. And the front brake cable had to be re-routed. Joe agreed the set-up looked right to have the cable loop to the left of the bucket and mount the gromet on the headlight ear’s clip. However that was just not going to work. Maybe my cable is not for the USA bars (it is same length as the old one). Who knows. We routed the cable to the right of the bucket and straight down. That gave us more play in the cable and it wasn’t such an absurd effort to get the adjusting nut onto the brake arm.
Joe didn’t like the amount of tension in the throttle so we re-routed the left side cable for less of a tight bend beneath the handlebars. Funny thing, that didn’t change the tension much. Must be those new throttle return springs I put on the carbs. More manly-man controls! He much approved of the Easy Clutch, and he helped me adjust it too (I didn’t have the clutch 100% engaging).
The moment of truth was upon us. I put a gallon of fresh premium gasoline in the tank. First time it was wet since the teardown. We set the petcocks to Reserve and turned the ignition key for the very first time. Headlight, check. High beam check. Tail light, check. Turn signals, check. Brake light, both switches, check. Instrument lights, all working except the oil pressure warning light. Either a bad switch or a bad connection (should light up until pressure is made) – deal with it later. Hold our breath and punch the starter button.
Nothing. Try a few more times because we’re stubborn. Nothing. I suspect the starter relay because my sense of wiring that was weak. Off comes the gas tank and Joe helps me re-wire that relay using the old one as a guide. There were some terminal # markings on the old one that are not present on the new relay. We try the starter, gas tank still off and plug wires disconnected. “Rarrarrarrarr!” Huzzah, it spins! Put the tank back on, turn the gas back on, reconnect the plugs.
“Rarrarrarrarr!” “Rarrarrarrarr!” Hmm, the starter is spinning the motor but no hint of ignition. Okay, pull one plug off and look for spark. Hmm, no spark. Well I did have the points wide open like the book said. No, Joe says we need closer to the right gap. So I twist the points closer, still not to book gap, and we get spark. “Rarrarrarrarr!” “Rarrarrarrarr!”
Hmm, “do you smell any gas?” “No, how about you?” And the spark plugs are not wet at all. Okay, so we pull off the valve covers and check the valve adjustment, not precise, just making sure we have some gap. Joe says loose noisy valves are less of a problem than tight valves that never close. Nope, gap seems about right and Joe turns the engine while covering the plug holes with fingers. Yep, we have compression (and Joe gets my anti-seize blown all over his hands). “Rarrarrarrarr!” “Rarrarrarrarr!” Nothing.
It could be bad timing but it’d have to be WAY out and I don’t think that’s possible. I never messed with the timing chain. We pull the float bowls off the carbs. Yep, we’ve got gas. But there is some fine gunk floating around in there. Joe removes one of the main jets, doable from below with carbs still on the bike. Ahh. Clogged. I scrounge for fine wire and come up with a set of pin-drill bits. He cleans jets on both sides until we’re satisfied that they are clear. He also noted they were loose in the carbs to start with. Odd, but then again I was the one who renovated the carbs. Slap everything back together.
“Rarrarrarrarr! P-too!” “Rarrarrarrarr! P-too!” Hey, it sort of wants to catch. One of the exhaust headers is warmer than the other so we were only sort-of firing one cylinder. Joe decides we should properly gap the points since they’re still way over spec. He shows me how to bend the feeler gauges to access the points more smoothly and we set a proper gap.
“Rarrarrarrarr! Vroom! Put-put-put-put-put-put…” I can’t believe it. It lives! Joe rolls back and forth under the carbs, first setting the idle adjust screws for max RPM (like it says in the book) and then setting the throttle adjust screws for actual idle speed (800-1,000 RPM). We jump for joy.
Joe calls his wife Mary. She must be out working in her garden so he leaves her a voicemail with the sound of an idling R-bike. I call Gary and make him listen to the engine purring. Joe’s got to go but his work here is done. I said I only needed an hour of his time. More like four hours.
Sorry I don’t have any photos to show of us leaping around the garage but we were busy! I’ve still got a load of things to do (mentioned way up above) before I hit the road. I’d say I’ll be scaring pedestrians next weekend. I’m too burnt now to do much more unless it cools off today (fat chance). I need to drain the carb float bowls again and I may need to clean jets again. I hope this is just form the first splash of gas through the tank but it is possible the POR-15 kit didn’t do the trick properly. I should add see-though gas line filters ASAP just to head off any future issues. Someone on the Airheads list mentions NAPA P/N 7-02323 or 7-02357 both fit the OEM gas lines.
Turns out to have been a good idea to wait on installing the electronic ignition because otherwise our troubleshooting would have been confounded by the little black box. Points certainly are easier to mess with. Now I can make the swap, knowing for sure the OEM system works.
It lives!

Great job, i did a 1970 R75 2 years ago and have loved it ever since. I didn’t have the stiff clutch cable issue, but most of the other problems. Still don’t have the carbs perfect, but close. I have 12 bikes and it is my preferred ride. Email me and i’ll send a picture Guy
Comment by Guy Hudson — August 31, 2007 @ 8:10 am
Thank You for your effort in posting…It’s nice to know I’m not the only one who spends a good chunk of my life working on my old “toaster tank” (ivory) If you email me I’ll send you some pics.
Cheers,Charlie
Comment by charlie murphy — September 12, 2007 @ 8:47 pm
Hey,
Still have your Toasrer BMW?
I have a white one orig purchased in Europe and brought back to states.
73 R75/5 (Born June 73)
Comment by Bob — February 28, 2011 @ 8:47 pm
Hello Bob! No, it is buried in the comments somewhere but I sold it to a nice fellow riding it around the San Francisco area now.
Comment by Penforhire — March 1, 2011 @ 10:14 am
Hi, followed your advice on the ignition switch upgrade (I could barely get my key into the original ignition). I can’t get my headlight ring back on either – once the bottom “snaps” back in the top almost pops off. My headlight bucket was goobered from a hit before I bought the bike. Is the top of the bucket supposed to be slightly raised so the ring grabs? I’m close to finding some sort of meatl grill from a jeep or dirt bike to screw over it to hold it in place.
Comment by Dale Hazelton — September 18, 2007 @ 11:04 am
Joe came over and we struggled with mine. Seems it needed to be slightly bent to match the shell’s shape. The top of the bucket should have a strong ridge to catch and hold the top of the rim (then you push or tap the bottom on). Sounds like you need to bend yours up a little.
Comment by penforhire — September 18, 2007 @ 12:48 pm
I’ll give that a try. If there were more of a lip on the bucket I’d drill a hole and put a couple of stainless pan head screws on. I had to use a dremel on the hole in the bucket to get my key to work as well. I also feel like I need to remove some of the material on the plastic slider, but I don’t want to….I think the hole in the collar should be set back a 64th or so….. Thanks for putting this info up on your site, it’s invaluable.
Comment by Dale Hazelton — September 18, 2007 @ 3:08 pm
Thanks for reading here! My dad’s original headlight had a hole in the chrome trim and it was screwed to the bucket. I’m not 100% sure but I don’t think that was stock. He must have had an issue or fear of the headlight popping off. That’d suck!
Comment by penforhire — September 18, 2007 @ 7:28 pm
Good for you–I got my R75/5 out this morning for the first time im about six months. A new battery plus a plug-in charger got it turned over enough to get gas down into those bings. It’s not running at full strength but well enough to ride into work, with a 75-degree afternoon in prospect. Hope that yours is on the road.
Comment by dware — March 12, 2008 @ 6:52 am
I’m not putting as many miles on it as I had hoped to. I am too afraid of getting stranded somewhere AND it really suffers in comparison to my newer bike.
The FJR is effortless transportation with a sense of total control, a huge safety margin, and a predatory attitude in traffic. The /5 feels like a bicycle in traffic, an impending sense of doom, and the controls feel like they have a built-in delay!
If only my wife would let me put it on a wooden plaque in the living room…
Comment by penforhire — March 17, 2008 @ 6:39 pm
I been following the restoration of your slash 5. Now that it’s been a year (I think) with the Mikuni’s, how are they working out for you? Do you have a good picture of the overall bike with them on? If you could do it again would just shot put the Bings right from the start?
How is the pointless ignition working also?
Thanks for any information.
Comment by Frank Lorbach — September 18, 2008 @ 2:56 pm
Hi Frank,
The Mikuni’s and ignition are working very well. Idle speed still varies a bit from cold to hot but I think that’s just the nature of single-jet carbs. I had one stall after hard riding (Angeles Crest Highway) that was hard to re-start until I choked it. Normally it starts best either fully cold (choked) or hot (no-choke). The middle temperatures seem harder to start from.
I haven’t had a single failure-to-start. That is the important thing to me. I recently pulled the plugs because it is getting a little harder to start. The good news is plug color is fine. Gap was a little wide so I tightened it but I think it may be time to check my valve clearances and timing again.
I also should pull the gas tank so I can get at the throttle adjusters. I think the left cable is now stretched a mm or two longer than the right (checking slack at the carbs).
You’ll see some other issues I noted in my XKE blog (charging rotor disaster).
If I had to do it again I’d still have tried the Bings because they are original and work for many riders. No way would I pay the price for new Bings though!
Comment by Penforhire — September 20, 2008 @ 7:24 am
What a great website and story about your r/75.. I wish you well with it..
I am buying an r75 later this week..
I have to ask.. with 9100.00 in parts alone.. do you wish you’d have bought a nice rider for about $3000- 3800.00? Or is the chase for a museum piece worth the bucks and effort. regardless.. it’s a cool piece and I wish you well
greg
Comment by GREG LONG — January 6, 2009 @ 5:40 pm
Greg, it certainly makes sense to start with the best specimen you can find. This particular bike had such sentimental value that I do not regret spending the money. My time is more valuable and I spent a huge number of hours on this. I recall estimating a minimum of 20 hours per week for nine months.
Comment by Penforhire — January 7, 2009 @ 7:52 am
Great website. Would you please tell where I can order an EZ clutch. Thanks Mate. Ken.
Comment by Ken Cowell — January 15, 2009 @ 6:26 pm
The EZ Clutch is the creation of Craig Vechorik over at Bench Mark Works (benchmarkworks.com). The site is not well organized but poke around for it or just contact them directly.
One of my better investments in this bike. Just make darn sure you keep the clutch adjusted properly since half the ‘throw’ is lost.
Comment by Penforhire — January 16, 2009 @ 7:57 am
Just drove home a ’73 R 75/5 with 19k’s on it, a bit of rust but looks and runs great. Pulled the fenders and tank to paint. Probably have to rebuild the headlight, and rewire. Suggestions, websites to visit, let me know.
Comment by Larry Stein — April 30, 2009 @ 12:09 pm
I just suscribed to your blog…how do I obtain the entire rebuilding series for the R75/6?
I was just given a ’73 R75/6 and would like to rebuild it (maybe not to museum quality like yours!).
Comment by Steve — October 5, 2009 @ 9:03 am
Hello Steve! I’m not sure what you mean by “rebuilding series.” I used the Clymers and Haynes manuals along with various other publications but there was no top-down guide to perform the restoration.
I just started unbolting things and fixing or replacing as I went. I’m sure the order in my blog is not optimal but it sort of made sense to me as I was doing it. Sometimes it was just frustration that made me move to a different part of the machine.
I can only suggest you read everything you can and try to find some local enthusiast mechanic who can help you through the rough patches, like I had BMW Joe to help me on a couple of head-scratchers.
Good luck with your own restoration. You can do it!
Comment by Penforhire — October 5, 2009 @ 11:51 am
Hello again, a year and a half later. I’m finally riding my R60/5 this summer. One big issue I had was with the Rocky Point ignition making my whole bike frame hot when I pushed the headlight bucket back on. Seems I have a Hella light and un-original bucket that was touching the switch housing. When you see a disclaimer on Stan’s site, well, that’s because of my unfounded complaining.
I understand your fear of getting stranded. My first long ride was met with a flat tire. Luckily it was at slow speed and it was a just a sticking valve stem. I had a small bike pump in my tank bag and I limped to a dealer to get my tire bead properly reseated on the rim.
One other thing – I use an additive called Star Tron in my tank. First time I rode the engine kept dieseling on after I shut the key off. Seems the ethanol fuel vapors have a lower combustion temperature, and the Star Tron helps deal with that somehow.
Cheers!
Comment by Dale Hazelton — July 19, 2010 @ 5:59 am
great info. I have a 1972-1/2 R75/5, bought new in Germany (i.e. domentic/non-export), approx. 95,000 mi. Kept in garage and not ridden since ’85, but don’t expect as extensive re-build as you had. Starting to get her up and running again. Already have new mufflers and cleaned Bing carbs. Considering EnDura Last Electronic Ignition. You recommend getting her running with the original points first, good advice. I’ll keep you posted.
Comment by John — October 12, 2010 @ 5:22 pm
yes use origional pt. and when running go for the electronic ign its wonderfull mine 75/5 1972 starts first every time. i bought mine new..
Comment by GEORGE DICKENSON — July 30, 2011 @ 11:54 am
Great work and some neat information. The Boyer is a Micro digital; it supposedly controls idling as well but can be a problem on older BMWs like the .5. Normally the Boyer used on this model would be the plain Mk111; it has a black box and controls the advance and retard curve only. I have experienced trouble using the red box digital on a 78 RS; it involved cutting the one function out to stop it running on after the ignition was turned off. Let me know how it goes for your BMW.
Comment by R James — April 11, 2011 @ 12:27 pm
how do u adjust the thottle??? i have many more questions. my email is fghagerman@gmail.com
Comment by forrest — June 17, 2011 @ 1:16 pm
Hello Forest, do you mean just idle RPM (easy)? Or overall setting fo the carbs (more complex)? The Haynes and Clymer guides have sections on this.
Look for the cable linkage adjusters. Make sure you have a couple of millimeters of slack before the grip starts moving the carb (butterfly or piston) at all. Then look for the idle adjust screw. That just limits the bottom height of the piston (on the Mikunis, I forget how it worked the Bings). Simple adjustment. Make sure you adjust for when the bike is fully warmed up. Takes about ten miles of riding to get that warm! Otherwise idle rises too high when warmed up. Use choke and keep throttle lightly goosed at stops, if necessary, when cold.
Unfortunately fuel/air mixture has an effect on idle too. The crude adjustment is maximizing RPM with that screw and turning it just a bit richer for safety. I think there are other techniques, outside of drilling for a manometer (I used a Morgan Carbtune), but that was mine.
It was an iterative process. Balance what you can. Ride. Go back to the fuel/air mix. Ride. Adjust idle. Ride some more. I’m sure pros do it faster, lol.
Comment by Penforhire — June 20, 2011 @ 8:58 am
HAY GUYS I HAVE A 1972 75/5 AND HAVE HAD IT SENSE NEW . BOUGHT IT NEW RIGHT OUT OF THE SERVICE . MY SPEEDO IS BAD AND I NED A NEW ONE . CAN ANY ONE HELP ON REBUILT OR NEW . USED OR WHAT WILL FIT. GEORGE . KALISPELL MT
Comment by GEORGE DICKENSON — July 30, 2011 @ 8:36 am
Hello George. I like hearing about folks who bought these machines new and still run them! I can recommend Palo Alto Speedometer to repair yours but they are not cheap. These speedos are a bit weak, prone to breaking in a couple of ways, but do make sure your cable from the tranny isn’t the problem before spending lots of $$$.
Comment by Penforhire — July 30, 2011 @ 1:47 pm
just sent my spedo in to palo alto for repair and the spedo cable was broke off at the trans from the weather , water ran down the cable and into the rubber past in to the trans connection. I retreaved it and sent it in as well . should take 3 weeks , at this time im replacing the 13 ribbed boots . picked them up for 40 .00 each . Ordered a new kick stand and . some one stold my right side battery cover at wall mart. found one for 50.00 its comming too . thanks for the information. george
.00
Comment by george — September 8, 2011 @ 2:40 pm
any links to a cheap new exhaust??
Comment by forrest — April 23, 2012 @ 1:44 pm
If you want cheap then search from the Emgo brand. E-bay is a likely source.
Comment by Penforhire — April 24, 2012 @ 7:47 am
Thanks for all the info,
I am in MO and ride my 72 every day 🙂 I keep having the ignition stall out because the key pops up. Two considerations…. Di-electric grease or replacing the switch. Did you buy your switch replacement online? I am having trouble finding one. Thank you so much! Beauty of a bike by the way.
Comment by daktamm — June 18, 2012 @ 8:24 am
Hello Daktamm, as noted in this post, I got the ignition set from Rocky Point Cycle. Note this is NOT an original ignition switch. Check out the photos in my post. I don’t recall if I ordered online or called them up to order. Their site is http://www.rockypointcycle.com.
Comment by Penforhire — June 22, 2012 @ 1:50 pm
I have had a /5 for about two years now. It is my favorite bike to ride because it is light, nimble and has torque. It has been punched out to 918 cc, has duel plugs and needs a lot more work.Currently I am having a 5 speed being gone through to put on the bike. It will nice to cruise and drop the rpm a little. Maybe a little better mileage. I use to get a bout 55mpg on a 1977 RS that I put 100k miles on before my bad neck got me off the bike. At least I can ride in the upright position now.
I am looking at a k100rs right now as a fixer upper. I will decide tomorrow whether to buy it or not. I also like my 2000 1100RT. It sucked when the front shock was bad and I didn’t even like riding it. New tires and a new tuned shock has made it great again!!
I wish I had kept my R100RS, like my Shelby Mustang and other vehicles that I have had. Doo Doo Occurs!!!!!!!!!!
Comment by Chuck Holmes — June 24, 2012 @ 12:21 am
Enjoying your documentation, insights and humor. I started restoration of a 1971 /5 approximately 2 years ago. Still plugging away and hope to finish up Summer 2015. I have experienced some of the same tribulations that you encountered. You have also helped me avoid some pitfalls by sharing your journey.
Thanks for taking time to write up the story of your restoration.
Regards
Comment by Dennis — January 4, 2015 @ 9:19 pm
Thanks for the link to Rocky Point Cycle and the Key conversion. My ’72 R75/5 key has been has been cutting out or not starting at all unless I keep my hand pressed down on the key. I ordered my kit today.
Comment by Martin Landry — October 4, 2015 @ 3:58 am
I find the 2LS brake mechanism fascinating. Fact is, believe it or not, I’m floundering around for some alternative shoe-plates for a drum, and I’m looking at what’s out there.
Right now I’m working on a 4LS Suzuki drum from a ’72 GT750J, for the “KZ440LOL” I’m building for my teenaged Ex-Daughter. It’s cool because the drum’s wrapped in a 3.00×16″ Borrani alloy rim, with low-profile Maxi-Scooter tires in 110/70-16 & 140/70-16, with an all NOS belt-drive for the KZ440LTD it’s based on. A pretty cool lil’ bike IMHO.
(((Meanwhile I’m also building a “CB900K0 Bol Bomber” (’82 CB900F Bol D’Or based tribute to the ’65 CB450K0 Black Bomber – DUH!) with triple DISC brakes which are all rebuilt and modified for the wire-spoke wheel swap, again with fat alloy rims and far wider tires. Two versions of 4.25×18″ Akront rear wheels, one drilled for Harley hub aka Honda front hub with bolt-up cush-drive (as yet not built) and the other with the cheap/easy swap to the SOHC CB750F1 ’75-’76 wire-spoke disc-brake hub – meanwhile up front I’ve got a 3.00×18″ and for a super trick alternate front wheel, the beautiful vintage NOS 3.50×16″ Super-Akront, for a proper “Freddie Spencer Replica” 16″/18″ stance. At some point, I wanna slap that extra pair on a Magna/Sabre-based replica of the CZ Type 860, with an INTERCEPTOR stance. Though I’m also doing a “skinny” set of rims in 2.50×18 Borrani & 3.50×18″ Super-Akront, for period-correctness and rims spec’d at the CB1100R works racer sizes! I’ve got the 296mm vented rotors from CB1100R, caliper hangers from CBX/GL1100A on the stock 39mm fork, which works with the original CB750K’s single disc at 296mm’s. However at some point, I wanna adapt the GL1500 fork, 41mm, and it’s shrouded rotors (albeit only 286mm – perhaps this can be changed) with a PC800 Pacific Coast’s “HUB” cut out and laced to that 3.00×18″ front rim. Which is the stock size on the GL1500. Well I guess I’m reminded of this because this PC800 “hub” would require straight-pull “NAIL-spokes” in much the same fashion as the BMW drum hubs. More or less the same size & shape really. Maybe a lil’ bigger diameter. It would be nice to think the rim drilling and spoke lengths would be the same. Though they’d have to be heavy-duty anyhow. And 3.00×18″ is a rim size only suitable for a late ’90s through Y2K+ Beemer. But hey – it could be useful if somebody were interested in building a “/5-replica” from that later Beemer. Seen that K1000 wire-spoke recently, but it uses this same GT750J 4LS drum. Which is insane! I’ve got a spare here too, but these things are only 200mm and a width only 120-125% that of the T500 Titan’s 2LS drum, which I’ve got for a side-car wheel on the KZ440LOL. The Kid’s idea! I have no idea how to pull it off. But it’s nice to think of the KZ racing against R50/2 outfits somewhere down the road. Seriously though – I see this same dinky 200mm 4LS drum used on some CBX-based (remember the 1000cc six-cylinder Honda?) “Hailwood Replica” bikes, and I’ve gotta shake my head. I contemplate building a DOHC-4 Honda with a 4LS drum, for my Lil’ GRRRL when she out-grows the lil’ KZ here. But even the most de-tuned version, a CB750C or CB750KZ, is too much bike for even the biggest 4LS drums. Though I might consider a Fontana 250mm or a widened reproduction of the Yamaha 260mm, IF the 750 were a stripped-down single-seater ultra-light. And a K75 let alone K1/K1000 is about on par with these models, in both power and speed. Not to mention WEIGHT!!! Heck, I feel like an ass using this lousy brake on the KZ440LOL…..)))
Well – whatever. I’m just sayin’ – I don’t know WHICH is more of a mind-frig, building mix-&-match DISC brakes, or figuring out how to maximize the stomping power of the Suzuki 4LS drum.
I’ve ventilated the center section in much the same fashion as the BMW 4LS drum, I’ve fitted wider shoes filed down from the T500 2LS version, for full contact of the Iron drum surface without gaps to either side. I’ve opened up ventilation of the side-plates as well. AND I’ve figured out the best way to set up the cams and linkages. Looking into an alternative perch, with a twin-cable conversion kit, for a better leverage ratio at the bar.
So yeah – I try to wrap my head around the way that this BEEMER 2LS drum linkage works, and I’m dumfounded. I can see how you’d get a more softly modulated, gradually incremented brake action, if you first contact with one shoe and then the other. But wouldn’t that second shoe’s initial bite be like a STEP in the middle of an otherwise soft and smooth application? I’d rather focus on using all four shoes at the same time, or both of two if that’s the design (hey, at 75-80% effectiveness in 50% or less of the weight, I see the T500 2LS drum as the better design. And following the logic of how I’d improve the thing given my druthers I’d prefer a 220mm Guzzi Eldorado 2LS drum. Or of course the Benelli 230mm 2XSLS “Dopple-Simplex” version. Either way, the 2LS linkage is better efficiency yes, but a double-sided drum is merely a GIMMICK if you’re not gonna increase it’s diameter! Diameter’s gotta be the most important feature of all. And so far as better controllability is concerned, I should think an SLS or better still twin-TRAILING drum would be the desirable option. Just so long as it’s got sufficient DIAMETER! Yeah, that 220mm Guzzi 2LS is looking REALLY good right now.
I chose the Suzuki version because of the 16″ rim diameter I chose. Well, that and the deep-drop-center and high shoulder of the Borrani version of which. Sadly, I’ve since found some decent 230mm 4LS and 220mm Eldorado 2LS drums, laced into FIrestone chromed-steel Harley-Davidson style 3.00×16″ or 3.50×16″ rims! Argh. Even so, I’m sure this drum is adequate for THIS bike. And the 230mm 4LS isn’t impressive for the DOHC-4 and V-4 Honda models which make up the brunt of my interests for custom building. Nor do they seem up to the Ducati square-case 900cc that I’ve seen those particular wheels on. So IDK wtf else I’d use that information for. Would’ve been nice to know, and to have used a 230mm Benelli Tornado “Dopple Simplex” drum and heck they’re worth about the same money these days. Aesthetically, I’d have preferred a 2LS drum. So yeah, the Guzzi Eldorado would’ve saved a few bucks and probably would’ve worked better. I do realize the “Victory Library” stats on drums gives a better performance for the Suzuki drum, however it evaluates hubs based on overall surface area available (when really, the area on the SHOES would be the better factor if this method were appropriate at all!) Whereas the diameter of the drum doesn’t merely relate to a Pi-proportion of overall surface area. The more critical factor is it’s bearing on the LEVERAGE ratio. The shoe tip to the axle being an effective LEVER. Of course, that leverage has to have it’s own relationship to the other lever involved, being the length of the tire’s surface to the axle. Ergo, the smaller wheel is gonna work the same drum harder. In simplest terms, think of how the smaller wheel will turn faster, ergo the drum itself turns faster and does more work ie makes more friction and subsequent waste heat, for a given distance of travel, ie stopping distance. (Which should theoretically be shorter?) There’s gotta be some factor of the drum’s diameter relative to the wheel. So too with disc brakes. Probably lost amid the other suspension changes inherent to changing wheel diameter. Dropping the nose, shortening the trail, steepening the rake, etc. Well I only HOPE the smaller wheel and tire will make more effective & efficient use of this damn hub. Perhaps the net effect would be not unlike that 220mm-230mm drum inside of an 18″ or 19″ rim? Just so long as it doesn’t over-heat! Or – am I missing something here, some critical element of the wheel’s geometry? BAH!
Anybody at all familiar with BMW’s should know by now that the Bavarians just had to do everything DIFFERENT. The question is whether or not it’s BETTER!
I’ve gotta wonder whether this “one shoe in front of the other” approach ends at the point where the 2nd shoe makes contact, or whether this proportionality continues through that point and at full contact of both shoes, whether there is more PRESSURE on the one shoe, than the other. Do the shoes WEAR-OUT proportionally? Or does one of ’em need to be replaced sooner than the other?
A main reason for asking, is I’ve got a spare center hub, cams linkages etc. But no shoe plates. And they’re not cheap. So I’m playing around with the idea of using some alternative shoe plates, of basically a rectangle with an axle and two cam holes, two pivots, maybe a torque-link bolt. And fill in the gaps on either side with some thin pie-plate tin or air scoop material. Without a speedometer ’cause I’m already planning to run electronic speedo with a magnet and pick-up) My machinist can whip ’em up cheap enough. I expect that selling off the Suzuki stuff could fund the whole project. If I wind up with a better than stock drum, it’d be well worth it!
But of course, this leaves options open. While I’ve got some good GT750 and T500 stuff – which all has good re-sale value right now – I could use an alternative system, perhaps Honda CB450K0 / CB72 / CB77 parts, or pretty much anything else in the 200mm range. I’ve heard that the CB450 shoe-plate in the T500 hub is a well-known period-correct upgrade. Something to do with the shoes being longer for more “wrap-around” than the stock bits. Or for that matter, we could mill out the hub to the full 203mm aka 8″ size, and use pretty much anything English or American as well. Harley had some very interesting drum linkages, including hydraulic-actuated SLS plates for both left-side and right-side versions of the “Juice-Drum” rear brake. Not nearly as sexy, but it sounds promising. Especially with a 2LS modification that’s known to work…..
It’s my understanding that the BMW 2LS drum was also in the 8″ aka 203mm range. Correct? Well the linkages and intermittent action seems INTERESTING. I only wonder whether it’s any BETTER, or just different for the sake of being different. As with so much else which BMW has done. I mean – there’s no way in heck you could convince me that the slash-five /5 series LEADING-AXLE FORK is an appropriate mod. I can get behind all sorts of stuff for leading-LINK forks, girder forks etc. But a telescopic fork should have an inline axle.
Or so I’ve been told?
So who would like to weigh in on this Beemer 2LS drum linkage? Is it “the stuff”? Or sheer BUNK?
Comment by SoyBoySigh — October 14, 2015 @ 5:57 am
Okay so I’ve now spent a few more minutes staring at the inside AND outside pics of the BMW 2LS drum. And now I’m not entirely convinced that the shoes do indeed move any differently from one another. Well, other than via the counter-force of those springs themselves! This is because of the exterior connection between the cams not being a typical LINKAGE at all, it’s the cable pulled between the two arms which distributes that cable force between the two. And only the imbalance between those springs which would bump that balance this way or that! Laverda used a similar cable-link on the early version of their 2LS drum on the SF 750 twin. Though IIRC their version had the cam pivots the same distance from the axle. Well I suppose even the Beemer version COULD be adapted to an adjustable linkage rod of either compression or tension types. Because that off-set cam placement makes no difference when the cams themselves are offset in different ways. I’d really wanna get out a micrometer and see what the lengths are on those cams, whether they wear differently etc, or whether their differing motions create some inherent imbalance….
Well this might actually be intended to counteract that type of thing! In an ordinary 2LS linkage, with both cams rotating in the same direction, the cams impinge on the end of the shoe at differing sides of the shoe’s … “toe” – the cams could be set up with identical curves and off-sets/heights, but it’s this differing point of contact which creates a different leverage between the shoe’s “toe” and it’s pivot point. I suppose a shoe would be designed to obviate this effect, by having that cam surface made perpendicular to the effective lever arm from the pivot…. Or by some other means which I can’t quite wrap my head around. Ha-ha. But yeah, I’ve read this somewhere before, that much as the design TRIES to balance forces between the two leading shoes, the one of ’em is never quite as powerful as the other. I’d expect the secondary pivot would lose some small amount of force via the linkage and it’s moving parts themselves? Miniscule, but it would be in there somewhere.
So yeah, I’m thinking maybe it’s not only that the cam’s reversed twist and that differing off-set of the two cams relative to the axle, possibly even the two different wire-gauges on those springs – that they’re not intended to make one shoe contact sooner or stronger than the other. But rather, to counteract these tendencies and to give the shoes TRUE balance in both timing and in force!
Whaddya think? Is it the one, or the other? ‘Cause I can see reasons for BOTH…..
-Sigh.
Comment by SoyBoySigh — October 14, 2015 @ 6:24 am
Hi – I have 1972 R75/5 and have installed the Rocky Point ignition switch mod wiring up as per RP’s diagram but blew the 8amp fuse that I fitted near the battery plus terminal when I pressed the horn button. Could you advise the sequence of wiring the original ignition switch wires into the main buss? Are any supposed to be paired up? I ask that as RP suggest you could have one or two buss blocks unused after wiring up. I have used all mine up. Thanks a lot.
Comment by Guy — November 10, 2022 @ 9:30 am